# CI/CD trong Unity
# Tổng quan về CI/CD
### CI (Continuous Integration)
****Khái niệm:**** Là thực hiện tự động hoá việc tích hợp cấc thay đổi từ một hoặc nhiều vào một kho chứa (repository) chung duy nhất.
****Mục tiêu:**** Tự động hoá một quy trình khi developer commit và push code lên repository. Quy trình này thường bao gồm:
- ****Checkout code:**** Lấy mã nguồn mới nhất
- ****Build:**** Build thành file sản phẩm có thể chạy được (apk, exe,...)
- ****Test:**** Chạy kiểm thử để đảm bảo các thay đổi không gây ra lỗi.
****Lợi ích:**** Phát hiện sớm các xung đột và lỗi tích hợp, đảm bảo code ở nhánh chính luôn ở trạng thái ổn định và có thể build được.
### CD (Continuous Delivery/Deployment)
****Khái niệm:**** Mở rộng từ CI, CD là tự động hoá việc phát hành phầm mềm đã được build và kiểm tử thành công. CD có 2 khái niệm con:
- ****Continuous Delivery:**** Sau khi CI thành công. Sản phẩm sẽ được tự động đóng gói và chuẩn bị sẵn sàng cho triển khai ra môi trường thực tế. Tuy nhiên, bước triển khai ra môi trường thực tếcần có sự phê duyệt thủ công.
- ****Continuous Deployment:**** Hệ thống tự động triển khai phiên bản build thành công ra môi trường production màkhông cần phê duyệt thủ công.
****Mục tiêu:****Giảm thiểu rủi ro và công sứctrong quá trình phát triển sản phẩm. Đảm bảo mọi bản build thành công đều có thể đượcphát hành một cách nhanh chóng và đáng tin cậy.
****Lợi ích:****Tăng tốcphát triển tính năng và bản vá lỗi tới người dùng,giảm thiểu lỗido con người trong quá trình phát triển thủ công.
### Tại sao cần CI/CD
Phát triển game với Unity có những đặc thù kiến CI/CD trở nên cực kỳ hữu ích:
- ****Tối ưu thời gian:**** Với những dự án lớn, nhiều assets thường sẽ mất nhiều thời gian để build. Việc tự động hoá giúp giải phóng máy tính của developer, build bằng các máy chuyên dụng.
- ****Build đa nền tảng:**** Unity hỗ trợ build đa nền tảng. CI/CD cho phép tự động hoá việc build cho tất cả các nền tảng một cách nhất quán.
- ****Quản lý môi trường build:**** Mỗi nền tảng yêu cầu các SDK và cấu hình môi trường riêng. CI/CD giúp đảm bảo môi trường build luôn được thiết lập đúng và nhất quán.
- ****Đảm bảo chất lượng:**** Tự động chạy Unity Test Framework trong pipeline CI giúp phát hiện lỗi sớm hơn.
- ****Cải thiện sự hợp tác:**** Đảm bảo rằng mọi thành viên trong team luôn làm việc trên một code base có thể build được và đã qua kiểm thử cơ bản.
- ****Phát hành nhanh chóng và nhất quán:**** Tự động hoá việc tạp các bản build cho QA, beta testers hoặc phát hành chính thức lên các cửa hàng ứng dụng.
### Các thành phần của hệ thống CI/CD cho Unity.
- ****Version Control System:**** Hệ thống quản lý phiên bản (GitHub, Gitlab, Bitbucket...). Đây là nơi lưu trữ code cũng như điểm khởi đầu để kích hoạt pipeline CI/CD/
****- CI/CD platform:**** Dịch vụ hoặc phần mềm điều phối toàn bộ quy trình (Jenkins, Gitlab CI/CD, Github Action, Unity Cloud Build, Azure DevOps...)
- ****Build Agent/Runner:**** Máy tính (vật lý hoặc ảo) được cài đặt Unity Editor, các SDK cần thiết và phần mềm của CI/CD platform để thực thi các công việc build và test.
- ****Testing Framework:**** Unity Test Framework để viết test và chạy các bài kiểm thử tự động.
- ****Artifact Storage****: Nơi lưu trữ các sản phẩm được build.
# Chuẩn bị hệ thống cho CI/CD
### Version Control System
Sử dụng các hệ thống quản lý source code thông thường như GitHub, Gitlab.
### CI/CD platform
#### Options
****Cloud-based:****
– ****Github Actions****: Hệ thống CI/CD của Github (free 2000min/month)
– ****Gitlab CI/CD****: Hệ thống CI/CD của Gitlab (free 400min/month)
– ****Azure DevOps****: Hệ thống CI/CD của Microsoft tương thích với các hệ thống sử dụng hệ sinh thái Azure (free 1800min/month)
– ****Unity Cloud Build****: Hệ thống CI/CD của chính Unity (free 200min/month
****Self-hosted****
****– Gitlab****
****– Azure****
****– Jenkins****
#### Choice
Lựa chọn sử dụng self-hosted với ****Jenkins****.
Lý do:
– Mã nguồn mở, miễn phí.
– Là công cụ phổ biến => cộng đồng lớn => nhiều hỗ trợ.
– Khả năng mở rộng cao (Hỗ trợ nhiều plugins)
– Hỗ trợ đa nền tảng.
****– Có thể cài trên Docker, tận dụng hệ thống XPEnology có sẵn.****
### Build Agent/Runner
Sử dụng máy tính chạy Windows 10, Macbook Air M1 có sẵn.
### Testing Framework
Unity Test Framework (chưa sử dụng – có thể tích hợp sau)
### Artifact Strorage
Sử dụng Synology Drive có sẵn và Google Drive.
# Cài đặt Jenkins Master trên Docker
Jenkins này được cài đặt trên Docker trên server XPEnology.
### Step 1: Cài đặt Jenkins.
Lần 1 mình có cài trực tiếp thông qua Container Manager trên DSM nhưng sau khi cài xong không thể truy cập đến Container đang chạy.
Lần 2 cài thông qua lệnh docker run sau đây
`docker run \`
` --name Jenkins-Controller \`
` --detach \`
**`--volume /volume1/docker/Jenkins:/var/jenkins \`**
` --publish 8080:8080 \`
`--publish 50000:50000 \`
` jenkins/jenkins:lts-jdk21`
**Đặc biệt**, dòng lệnh “`--volume /volume1/docker/Jenkins:/var/jenkins \`” dùng để ánh xạ thư mục host và container. Đảm bảo mọi dữ liệu của Jenkins được lưu trữ vào thư mục `/volume1/docker/Jenkins` trên DSM và sẽ không bị mất đi khi container dừng hoặc xoá.
### Step 2: Cài đặt Plugin
Tại đây do chưa tìm hiểu được để cấu hình CI/CD cho Unity cần những plugin nào nên mình chọn **“Install suggested plugins”**.
Các plugin cần thiết có thể cài đặt sau.
Đã cài thêm
– **Blue Ocean:** Một giao diện hiện đại, trực quan, giúp dễ dàng quản lý và sử dụng Jenkins
– **Email Extension:** Gửi email thông báo.
– **Discord Notify:** Gửi thông báo qua discord.
### Step 3: Cài đặt Jenkins URL
Tạo chứng chỉ SSL
– Trên DSM truy cập **Control Panel -> Security -> Certificate.**
– Tạo một Certificate mới với domain name là tên miền muốn tạo certificate (ở đây là `jenkins.thanhdv.com`).
Tạo Reverse Proxy để xử lý truy cập. Cho phép truy cập qua `jenkins.thanhdv.com` thay vì `thanhdv.com:8080`
– Trên DSM truy cập **Control Panel -> Login Portal -> Advanced -> Reverse Proxy** và tạo mới.
– General:
\+ Description: Đặt tên gợi nhớ, mô tả (ở đây mình đặt là Jenkins)
– Source (Setup cho truy cập từ bên ngoài)
\+ Protocol: HTTPS
\+ Hostname: jenkins.thanhdv.com
\+ Port: 443
\+ Enable HSTS: Bật để tăng bảo mật.
– Destination
\+ Protocol: HTTP (vì Jenkins trong docker đang chạy HTTP)
\+ Hostname: localhost
\+ Port: 8080 (8080 là mặc định. Nếu thay bằng port được setup trong lúc cài đặt Container).
Gán chứng chỉ cho Reverse Proxy
– Quay lại **Control Panel -> Security -> Certificate.**
– Config chứng chỉ jenkins.thanhdv.com đã tạo ở trên cho dịch vụ jenkins.thanhdv.com.
Điền `https://jenkins.thanhdv.com` vào **Jenkins URL** nếu đang trong quá trình cài đặt ban đầu hoặc truy cập **Manage Jenkins -> System -> Jenkins Location -> Jenkins URL**
# Cài đặt Jenkins Agent trên Windows 10
### Step 1: Cài đặt phần mềm cần thiết
****JDK:**** JDK là cần thiết để chạy tiến trình của Jenkins Agent. Tại đây mình sử dụng JDK 21.
****Git****: Git để cập nhật code tử các repo
****VSCode****: Code editor để sửa code nếu cần thiết.
****Unity****: UnityHub, Unity Editor, và các module cần thiết
Và cuối cùng là tạo thư mục làm việc riêng cho JenkinsAgent (ở đây là C:\\JenkinsAgent)
### Step 2: Tạo Node Agent trong Jenkins Controller
Truy cập ****Manage**** ****Jenkins -> Nodes**** và tạo một Node mới.
****Lưu ý:****
– ****Permanent Agent**** phù hợp với case hiện có. Tức là một agent luôn sẵn sàng. Để phân biệt với Dynamic Agents.
– ****Number of executors:**** số lượng build đồng thời có thể chạy trên agent.
– ****Remote root directory:**** đường dẫn đến thư mục làm việc đã tạo ở bước trên `C:\JenkinsAgent`.
– ****Labels****: Nhãn phân loại các agent. Sau này trong Jenkins file sẽ dùng label để chị định job chạy trên agent nào (`agent { label 'windows && unity' }`)
– ****Usage**** là cách Jenkins lên lịch sử dụng agent này.
– ****Launch method:**** phương thức kết nối.
– ****Availability****: Kiểm soát khi nào Jenkins bắt đầu, kết thúc agent này.
### Step 3: Kết nối Agent
Truy cập vào node vừa tạo thông qua ****Manage**** ****Jenkins -> Nodes**** ta sẽ thấy hướng dẫn kết nối bằng command line.
Chọn command line phù hợp rồi chạy trên máy Agent qua cmd.
Khi chạy lệnh “`curl.exe -sO https://jenkins.thanhdv.com/jnlpJars/agent.jar & java -jar agent.jar -url https://jenkins.thanhdv.com/ -secret 73a6b19....e63df7 -name "Unity-WindowsAgent" -webSocket -workDir "C:\JenkinsAgent"`” gặp lỗi không thể kết nối do truy cập thông qua reverse proxy. Để khắc phục thì không truy cập thông qua reverse proxy nữa mà truy cập qua port như thông thường. Thay `https://jenkins.thanhdv.com` bằng `http://thanhdv.com:8080`
Lệnh chính xác cần chạy là
`curl.exe -sO http://thanhdv.com:8080/jnlpJars/agent.jar & java -jar agent.jar -url http://thanhdv.com:8080/ -secret 73a6b193f2a487ccf1ccf5b494691be0319371e44ed67c4bab29835363e63df7 -name "Unity-WindowsAgent" -webSocket -workDir "C:\JenkinsAgent"`
### Step 4: Chạy JenkinsAgent như một service của Windows (tuỳ chọn)
Lệnh trên chỉ chạy khi cửa sổ cmd đang bật gây bất tiện. Thế nên để sử dụng một cách thuận thiện hơn mình sẽ cài đặt nó như một service sử dụng ****WinSW****
Tải WinSW trên Github và lưu vào folder của Jenkins Agent (C:\\JenkinsAgent)
Đổi tên file sao cho có ý nghĩa, ví dụ như `jenkins-agent.exe`
Tải file agent.jar qua đường dẫn trên `http://thanhdv.com:8080/jnlpJars/agent.jar` có thể thấy ở command line. Lưu vào cùng thư mục làm việc với WinSW
Tạo file xml với nội dung như sau:
``
` JenkinsAgentUnityWin Jenkins Agent (Unity Windows) Chạy Jenkins agent để build Unity trên máy Windows này, kết nối tới Jenkins Controller.`
` %JAVA_HOME%\bin\java.exe`
` -Xmx512m -jar agent.jar -url http://thanhdv.com:8080/ -secret 73a6b193f2a487ccf1ccf5b494691be0319371e44ed67c4bab29835363e63df7 -name "Unity-WindowsAgent" -webSocket -workDir "C:\JenkinsAgent"`
` `
` 10240 5 `
` C:\JenkinsAgent`
``
Lưu ý:
File xml cần đặt tên giống với file exe phía trên (chỉ khác phần mở rộng xml và exe).
**``** là đường dẫn đến java.exe. Nếu chưa có biến môi trường JAVA\_HOME thì cần thêm vào trong Windows.
**``** chứa đầy đủ các tham số trên command line. Phần từ phía sau ký tự &
**``** là đường dẫn đến thư mục làm việc của Jenkins Agent.
Cài đặt service
– Mở cmd trong cửa sổ thư mục của JenkinsAgent hoặc dùng lệnh cd để chuyển đến thư mục làm việc của JenkinsAgent
– Chạy lệnh `.\jenkins-agent.exe install` để cài đặt.
– Chạy tiếp lệnh `.\jenkins-agent.exe start` để chạy service (Hoặc chạy trong của sổ services.msc tìm tới tên service `Jenkins Agent (Unity Windows)` setup trong file xml)
– Kiểm tra trên Jenkins (****Manage Jenkins**** -> ****Nodes****) nếu thấy nodes online tức là đã thành công.
– Setup service auto restart. Trong cửa sổ ****services.msc -> Recovery****. Chuyển tất cả các trường “****First failure****“, “****Second failure****“, “****Subsequent failures****” thành “****Restart the Service****“
****Lưu ý:****
– Gỡ cài đặt service bằng lệnh `.\jenkins-agent.exe uninstall`
– Nếu chạy service gặp lỗi có thể kiểm tra các file log trong thư mục cài đặt của service (trong trường hợp này là C:\\JenkinsAgent)
# Cài đặt Jenkins Agent trên Proxmox VE
### Step 1: Khởi tạo Container
- Tải template: Trên PVE tải template **Ubuntu 24.04**[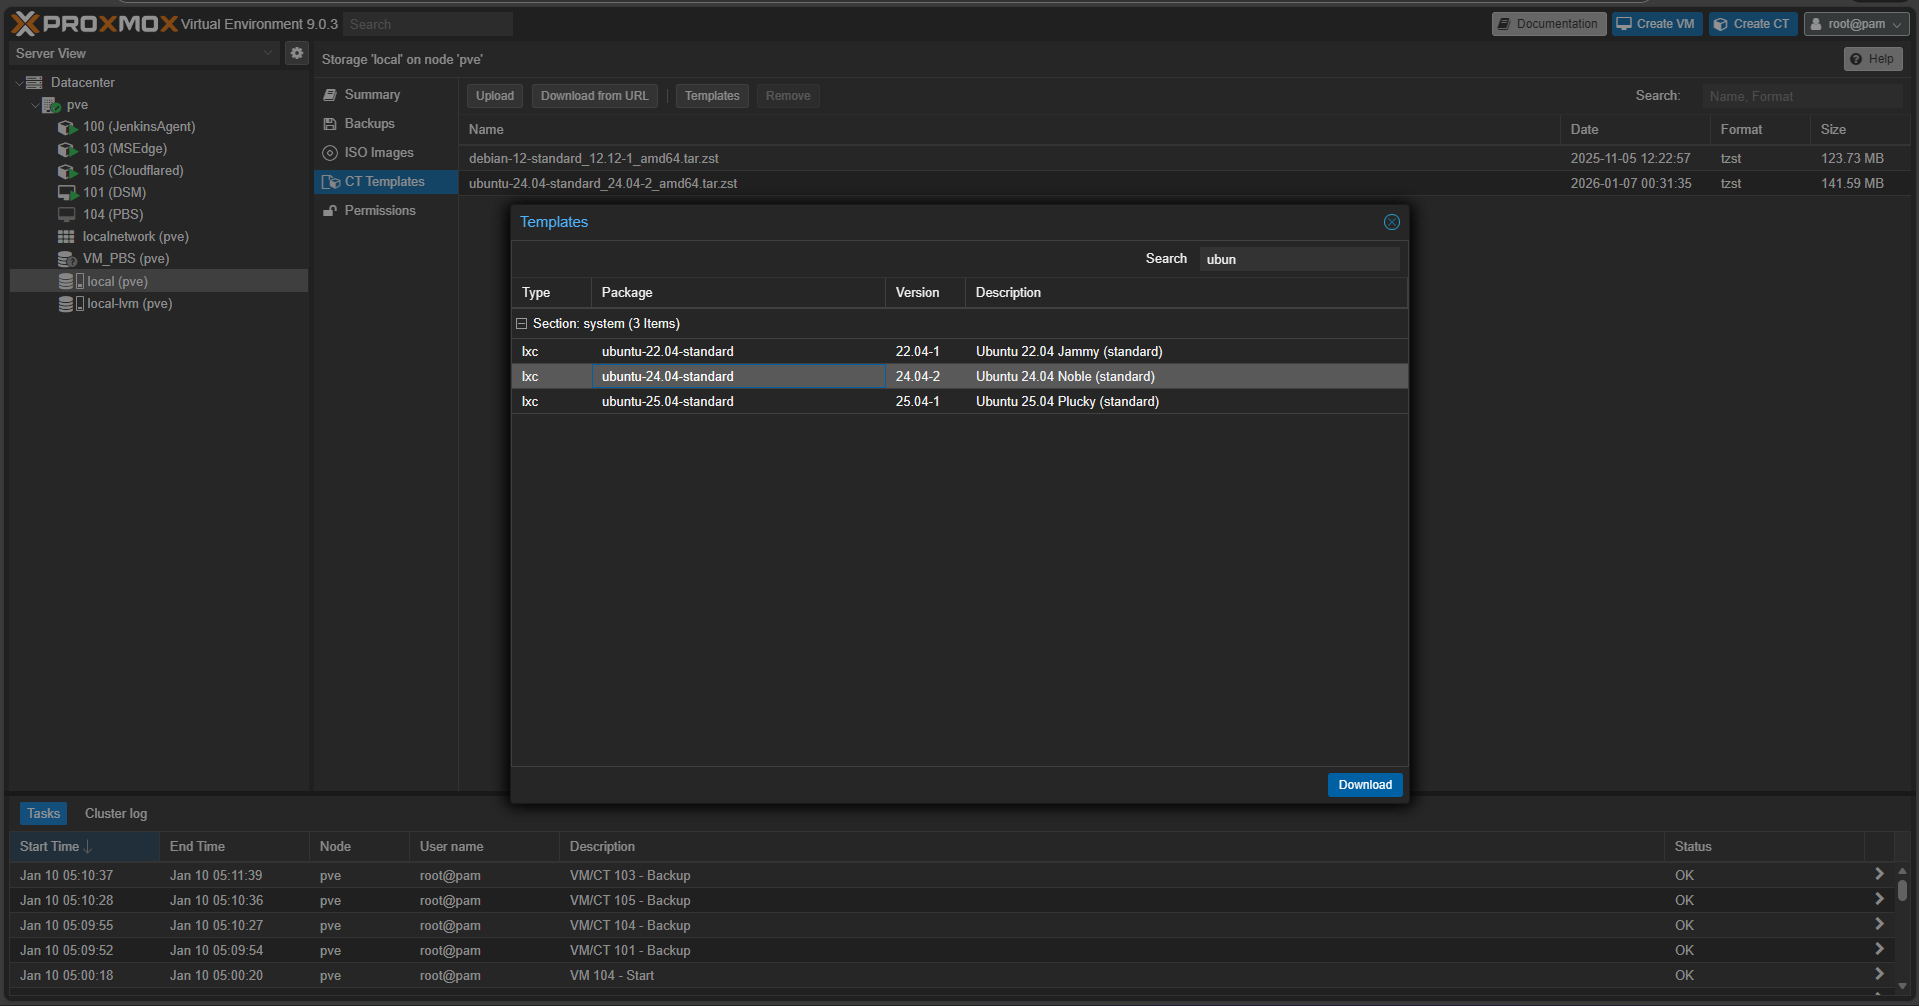](https://knowledge.thanhdv.com/uploads/images/gallery/2026-01/image.png)
- Tại CT với template Ubuntu vừa tải về
- CPU: 2 - 4 core
- RAM: 2048 MB (Swap 512 MB)
- Disk: 16GB (có thể mở rộng thêm nếu cần)
- Network: sử dụng **Static IP** dạng 192.168.1.100/24 (**nhớ điền Gateway** 192.168.1.1)
- Ok, Create and Start container vừa tạo.
### Step 2: Thiết lập môi trường cho Agent
Đăng nhập vào Agent với quyền root và mật khẩu đã tạo.
- Cài đặt các tools cần thiết:
- `apt update && apt upgrade -y // Update các package đã có trong hệ thống.`
- `apt install openjdk-17-jdk git curl -y // Cài đặt JDK, Git, curl`
- Tạo user riêng cho jenkins
- `adduser jenkins // Tạo user tên là jenkins`
- Tạo thư mục làm việc và cấp quyền cho `jenkins`
- `mkdir -p /var/jenkins_home // Tạo thư mục jenkins_home `
- `chown -R jenkins:jenkins /var/jenkins_home // Cấp quyền cho user jenkins`
- Chuyển SSH từ Socket sang Service (Mặc định SSH sẽ ở socket, chỉ hoạt động khi có yêu cầu. Để tránh gặp lỗi trong quá trình tự động thì nên chuyển sang Service)
- `systemctl stop ssh.socket `
`systemctl disable ssh.socket `
`systemctl enable ssh.service `
`systemctl start ssh.service`
### Step 3: Thiết lập SSH Key
Tạo SSH Key để Jenkins Master có thể ra lệnh cho Agent mà không cần nhập mật khẩu mỗi khi cần build.
```sh
# Chuyển sang user jenkins
su - jenkins
# Tạo key (không đặt passphrase)
ssh-keygen -t rsa -b 4096 -f ~/.ssh/id_rsa
# Tự cấp quyền cho chính mình (Authorized Keys)
cd ~/.ssh
cat id_rsa.pub >> authorized_keys
chmod 700 ~/.ssh
chmod 600 ~/.ssh/authorized_keys
# Hiển thị Private Key để copy vào Jenkins Master
cat id_rsa
```
### Step 4: Tạo Node mới trên Jenkins Master
- Tạo Credentials mới loại **SSH Username with private key** với Private Key vừa lấy ở bước trên.
- Chú ý domain là global
- Tạo Node. Jenkins Master > Manage Jenkins > Node > New Node
- **Remote root directory**: `/var/jenkins_home` (thư mục làm việc đã tạo ở trên)
- **Label**: label bất kỳ để dùng trong jenkinsfile.
- **Host**: IP của Agent đã tạo ở Bước 1.
- **Host Key Verification Strategy:** Chọn **"Non-verifying Verification Strategy"**.
- Ok tạo Node. Nếu có respond như hình thì tức là đã tạo và kết nối thành công. Nếu không thì kiểm tra log để biết vấn đề.[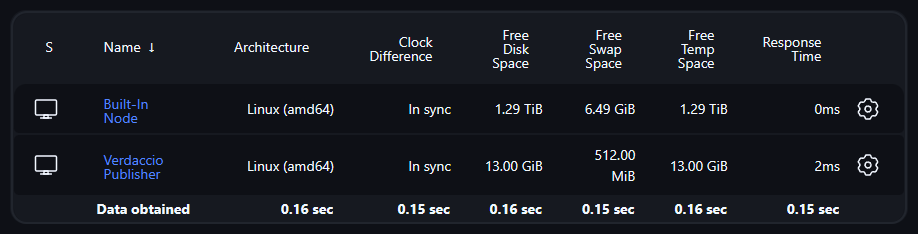](https://knowledge.thanhdv.com/uploads/images/gallery/2026-01/nHBimage.png)
### Step 5: Update Jenkinsfile
- Thay đổi chính so với Agent Windows:
- `bat` > `sh`
- `del /F /Q` > `rm -f`