
Bắt đầu với Job System
Mục tiêu
Hướng dẫn này giới thiệu những nguyên tắc cơ bản về cách sử dụng jobs để tận dụng lợi thế của CPU đa nhân.
Kết thúc khóa học này bạn sẽ có thể:
- Tạo, lập lịch và kết thúc jobs “đơn luồng” (single-threaded).
- Tạo, lập lịch và kết thúc jobs song song.
- Lên lịch cho các jobs phụ thuộc các jobs khác.
- Sử dụng NativeArrays.
Tổng quan
Hướng dẫn này giới thiệu những nguyên tắc cơ bản về cách sử dụng jobs để tận dụng lợi thế của CPU đa nhân. Chúng ta sẽ đi từng bước qua mẫu Jobs tutorial trong Entity Component Samples repository trên GitHub.
Trong mẫu này, bạn sẽ bắt đầu với Seekers (cục xanh) và Targets (cục đỏ) mỗi cục di chuyển chậm theo hướng ngẫu nhiên trên mặt phẳng 2D. Công việc của bạn là vẽ đường debug màu trắng từ Seeker tới Target gần nhất theo thời gian thực.
Đầu tiên bạn sẽ được xem cách xử lý vấn đề mà không sử dụng jobs. Sau đó bạn sẽ học cách giải quyết với jobs, và chúng ta sẽ nhìn vào profiles để xem hiệu năng được cải thiện.
Trước khi bắt đầu
Hướng dẫn này giả định rằng bạn có hiểu biết cơ bản về C# và GameObject, và bạn đã hoàn thành hướng dẫn trước đó của khóa học này để làm quen với DOTS và entities.
Set up Project:
- Tạo project sử dụng mẫu 3D (URP) Template.
- Cài package Collections thông qua Package Manager.
Thêm package Collections đồng thời tự động thêm Burst và Mathematics như một ràng buộc
Tạo Seekers và Targets đi lang thang trên mặt phẳng 2D
Đầu tiên, cần định nghĩa các MonoBahaviour đơn giản di chuyển theo hướng ngẫu nhiên. Tham khảo code dưới đây.
1. Tạo script Obj.cs và thêm code
private Vector3 Direction;
    public float Speed = 100f;
    public float TimeCounter = 0f;

    private void Start()
    {
        Direction = new Vector3(Random.Range(-1f, 1f), 0, Random.Range(-1f, 1f)).normalized;
    }

    public void Update()
    {
        TimeCounter += Time.deltaTime
        if (TimeCounter > 3)
        {
            Direction = new Vector3(Random.Range(-1f, 1f), 0, Random.Range(-1f, 1f)).normalized;
            TimeCounter = 0;
        }
        transform.localPosition += Direction * Time.deltaTime * Speed;
    }
2. Tạo script Seeker.cs và Target.cs kế thừa Obj.cs
3. Tạo 2 prefab Seeker và Target chứa component Seeker và Target
using UnityEngine;
public class Spawner : MonoBehaviour
{
    public static Transform[] TargetTransforms;
    public static Transform[] SeekerTransforms;
    public GameObject SeekerPrefab;
    public GameObject TargetPrefab;
    public int NumSeekers;
    public int NumTargets;
    public Vector2 Bounds;
    public void Start()
    {
        Random.InitState(123);
        MaterialPropertyBlock seekerPropertyBlock = new();
        seekerPropertyBlock.SetColor("_BaseColor", Color.blue);
        MaterialPropertyBlock targetPropertyBlock = new();
        targetPropertyBlock.SetColor("_BaseColor", Color.red);
        SeekerTransforms = new Transform[NumSeekers];
        for (int i = 0; i < NumSeekers; i++)
        {
            GameObject go = Instantiate(SeekerPrefab);
            SeekerTransforms[i] = go.transform;
            go.transform.localPosition = new Vector3(Random.Range(0, Bounds.x), 0, Random.Range(0, Bounds.y));
            Renderer renderer = go.GetComponent<Renderer>();
            renderer.GetPropertyBlock(seekerPropertyBlock);
            renderer.SetPropertyBlock(seekerPropertyBlock);
        }
        TargetTransforms = new Transform[NumTargets];
        for (int i = 0; i < NumTargets; i++)
        {
            GameObject go = Instantiate(TargetPrefab);
            TargetTransforms[i] = go.transform;
            go.transform.localPosition = new Vector3(Random.Range(0, Bounds.x), 0, Random.Range(0, Bounds.y));
            Renderer renderer = go.GetComponent<Renderer>();
            renderer.SetPropertyBlock(targetPropertyBlock);
        }
    }
}
4. Tạo GameObject Spawner. Thêm component Spawner và điền các thông số cần thiết.
Nhấn play và bạn sẽ thấy các khối xanh đỏ đi lang thang nhưng chưa thấy đường debug màu trắng nối Seeker và Target.
Tìm Target gần nhất không sử dụng jobs
Để tìm Target gần nhất cho mỗi Seeker và vẽ đường debug trắng giữa chúng ta cần một MonoBehaviour khác. Để tạo MonoBehaviour này tham khảo phần dưới đây:
1. Tạo script FindNearest.cs
using UnityEngine;
public class FindNearest : MonoBehaviour
{
    public void Update()
    {
        // Find the nearest Target.
        // When comparing distances, it's cheaper to compare
        // the squares of the distances because doing so
        // avoids computing square roots.
        foreach (var seekerTransform in Spawner.SeekerTransforms)
        {
            Vector3 seekerPos = seekerTransform.localPosition;
            Vector3 nearestTargetPos = default;
            float nearestDistSq = float.MaxValue;
            foreach (var targetTransform in Spawner.TargetTransforms)
            {
                Vector3 offset = targetTransform.localPosition - seekerPos;
                float distSq = offset.sqrMagnitude;
                if (distSq < nearestDistSq)
                {
                    nearestDistSq = distSq;
                    nearestTargetPos = targetTransform.localPosition;
                }
            }
            Debug.DrawLine(seekerPos, nearestTargetPos);
        }
    }
}
2. Tạo GameObject FindNearest và thêm component FindNearest
Trong Update, với mỗi Seeker. MonoBehaviour kiểm tra khoảng cách với tất cả các Target để tìm ra Target gần nhất và vẽ đường debug.
Note: Để thấy đường debug bạn cần bật Gizmos trong Scene view hoặc Game view
Đây là profile của 1frame chạy với 1000 Seekers và 1000 Targets. Tổng thời gian cho tìm kiếm khoảng 126ms cho mỗi frame
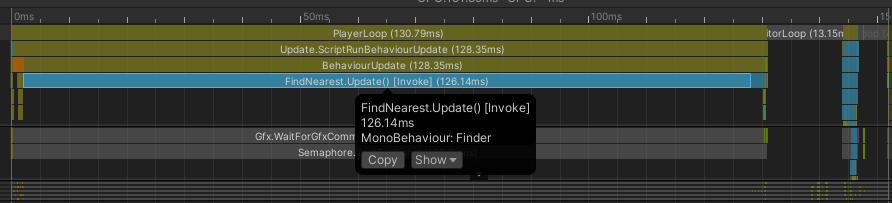
Rõ ràng đây không phải là một kết quả tốt nhưng k có gì đáng ngạc nhiên khi giải pháp này sử dụng phương pháp N2 chỉ chạy trên main thread.
Tìm Target gần nhất sử dụng jobs single-threaded
Bằng cách đặt một công việc khó vào job. Bạn có thể di chuyển công việc từ main-thread tới các worker thread. Và bạn có thể Burst-compile code. Jobs và Burst-Compiled code không thể truy cập bất kỳ object được quản lý nào (Bao gồm GameObject và GameObject component), nên trước tiên bạn phải copy tất cả dữ liệu cần xử lý bởi job vào collections không bị quản lý ví dụ như NativeArrays.
Note: Nghiêm túc mà nói thì jobs có thể truy cập các object được quản lý nhưng làm như vậy yêu cầu sự quan tâm đặc biệt và đó thường không phải ý tưởng hay. Bên cạnh đó chúng ta muốn Burst-compile job này để tăng tốc và Burst-compile code chắc chắn không thể truy cập object bị quản lý.
Note: Mặc dù chúng ta vẫn có thể sử dụng Vector3 và Mathf nhưng nên thay thế bằng float3 và math từ Mathematics package, đã được tối ưu đặc biệt cho Burst.
Để chuyển sang job, thực hiện các bước sau:
Tạo FindNearestJob.cs
using Unity.Burst;
using Unity.Collections;
using Unity.Jobs;
// We'll use Unity.Mathematics.float3 instead of Vector3,
// and we'll use Unity.Mathematics.math.distancesq instead of Vector3.sqrMagnitude.
using Unity.Mathematics;
// Include the BurstCompile attribute to Burst compile the job.
[BurstCompile]
public struct FindNearestJob : IJob
{
    // All of the data which a job will access should
    // be included in its fields. In this case, the job needs
    // three arrays of float3.
    // Array and collection fields that are only read in
    // the job should be marked with the ReadOnly attribute.
    // Although not strictly necessary in this case, marking data
    // as ReadOnly may allow the job scheduler to safely run
    // more jobs concurrently with each other.
    [ReadOnly] public NativeArray<float3> TargetPositions;
    [ReadOnly] public NativeArray<float3> SeekerPositions;
    // For SeekerPositions[i], we will assign the nearest
    // target position to NearestTargetPositions[i].
    public NativeArray<float3> NearestTargetPositions;
    // 'Execute' is the only method of the IJob interface.
    // When a worker thread executes the job, it calls this method.
    public void Execute()
    {
        // Compute the square distance from each seeker to every target.
        for (int i = 0; i < SeekerPositions.Length; i++)
        {
            float3 seekerPos = SeekerPositions[i];
            float nearestDistSq = float.MaxValue;
            for (int j = 0; j < TargetPositions.Length; j++)
            {
                float3 targetPos = TargetPositions[j];
                float distSq = math.distancesq(seekerPos, targetPos);
                if (distSq < nearestDistSq)
                {
                    nearestDistSq = distSq;
                    NearestTargetPositions[i] = targetPos;
                }
            }
        }
    }
}
Trong method Execute() vẫn sử dụng logic N2 , nhưng bây giờ vì n chạy trên Burst-compiled job. Job sẽ ăn ít thời gian xử lý của CPU hơn và có thể chạy trên worker thread thay vì main thread.
Để chạy job, khởi tạo và lập lịch cho nó.
using Unity.Collections;
using Unity.Jobs;
using Unity.Mathematics;
using UnityEngine;
public class FindNearest : MonoBehaviour
{
    // The size of our arrays does not need to vary, so rather than create
    // new arrays every field, we'll create the arrays in Awake() and store them
    // in these fields.
    NativeArray<float3> TargetPositions;
    NativeArray<float3> SeekerPositions;
    NativeArray<float3> NearestTargetPositions;
    public void Start()
    {
        Spawner spawner = Object.FindObjectOfType<Spawner>();
        // We use the Persistent allocator because these arrays must
        // exist for the run of the program.
        TargetPositions = new NativeArray<float3>(spawner.NumTargets, Allocator.Persistent);
        SeekerPositions = new NativeArray<float3>(spawner.NumSeekers, Allocator.Persistent);
        NearestTargetPositions = new NativeArray<float3>(spawner.NumSeekers, Allocator.Persistent);
    }
    // We are responsible for disposing of our allocations
    // when we no longer need them.
    public void OnDestroy()
    {
        TargetPositions.Dispose();
        SeekerPositions.Dispose();
        NearestTargetPositions.Dispose();
    }
    public void Update()
    {
        // Copy every target transform to a NativeArray.
        for (int i = 0; i < TargetPositions.Length; i++)
        {
            // Vector3 is implicitly converted to float3
            TargetPositions[i] = Spawner.TargetTransforms[i].localPosition;
        }
        // Copy every seeker transform to a NativeArray.
        for (int i = 0; i < SeekerPositions.Length; i++)
        {
            // Vector3 is implicitly converted to float3
            SeekerPositions[i] = Spawner.SeekerTransforms[i].localPosition;
        }
        // To schedule a job, we first need to create an instance and populate its fields.
        FindNearestJob findJob = new FindNearestJob
        {
            TargetPositions = TargetPositions,
            SeekerPositions = SeekerPositions,
            NearestTargetPositions = NearestTargetPositions,
        };
        // Schedule() puts the job instance on the job queue.
        JobHandle findHandle = findJob.Schedule();
        // The Complete method will not return until the job represented by
        // the handle finishes execution. Effectively, the main thread waits
        // here until the job is done.
        findHandle.Complete();
        // Draw a debug line from each seeker to its nearest target.
        for (int i = 0; i < SeekerPositions.Length; i++)
        {
            // float3 is implicitly converted to Vector3
            Debug.DrawLine(SeekerPositions[i], NearestTargetPositions[i]);
        }
    }
}
Nhìn lại profile Update chỉ tốn 2.5ms cho cả quá trình với Burst-Compilation bật.
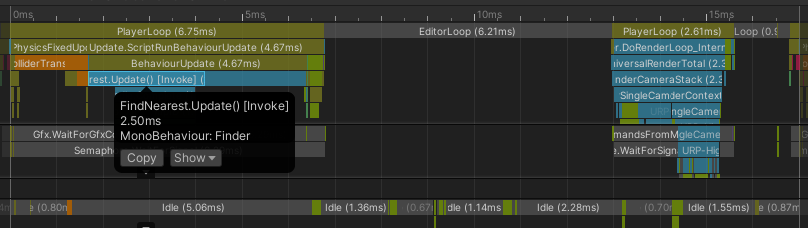
Lưu ý rằng với cách này các jobs đều chạy trên main thread. Điều này có thể xảy ra khi gọi Complete() một job chưa được rút ra khỏi hàng đợi. Bởi vì main thread sẽ ở trạng thái không hoạt động khi chờ job kết thúc nên main thread có thể chạy job đó.
Thêm một lưu ý là thời gian để update cho Seeker và Target MonoBeviour cũng rất quan trọng, đặc biệt khi tăng số lượng Seeker và Target. Đây chỉ yếu là chi phí để cập nhật riêng lẻ cho từng MonoBehaviour. Giải pháp tốt nhất là cập nhật tất cả trong 1 update (Tốt hơn nữa là sử dụng Entities để thay thế GameObject, mặc dù điều này đi quá mục tiêu của hướng dẫn này).
No comments to display
No comments to display